Tables in LaTeX are created using the tabular environment and allows a user to specify the different column widths, positions, which provides the writer a lot of flexibility towards how they would like to create or display a table.
To get a better idea of how a table works in LaTeX, let’s take a look at some sample code to understand the general syntax it has:
\documentclass{article}
\begin{document}
 \begin{tabular}{|c|c|c|}
 \hline
 column 11 & column 12 &  column 13 \\
  \hline
 column 21 & column 22 & column 23 \\
  \hline
 column 31 & column 32 & column 33 \\
  \hline
\end{tabular}
\end{document}
Table of Contents
Now that we have a general idea of how to use LaTeX tables, we can move on to the main topic which is around rotating tables in LaTeX.
There is multiple ways of rotating tables, but they all share the similar idea of treating the table as a sort of image, and trying to keep the same format of the table as it’s rotated by some ϕ degrees
rotatebox command from the graphicx package
For uncomplicated tables that doesn’t have special content such as text from verbatim or mathematical text, then you could use the \rotatebox command from graphicx package. The general syntax is as follows:
\rotatebox{angle}{
% table
}
We measure the angle in degrees, and unfortunately, for those who prefer radians, they won’t be applicable. Once we place our table inside the block, it will be treated as an image and rotated according to your specific angle.
Let’s use our table from our previous section and rotate it in 120, 90 and 60 degrees, then the code will look like the following:
\documentclass{article}
\usepackage{graphicx}
\begin{document}
\rotatebox{120}{
  \begin{tabular}{|c|c|c|}
   \hline
  column 11 & column 12 &  column 13\\
   \hline
  column 21 & column 22 & column 23 \\
   \hline
  column 31 & column 32 & column 33 \\
   \hline
 \end{tabular}}
\rotatebox{90}{
 \begin{tabular}{|c|c|c|}
   \hline
  column 11 & column 12 &  column 13\\
   \hline
  column 21 & column 22 & column 23 \\
   \hline
  column 31 & column 32 & column 33 \\
   \hline
 \end{tabular}}
\rotatebox{60}{
 \begin{tabular}{|c|c|c|}
   \hline
  column 11 & column 12 &  column 13\\
   \hline
  column 21 & column 22 & column 23 \\
   \hline
  column 31 & column 32 & column 33 \\
   \hline
 \end{tabular}}
\end{document}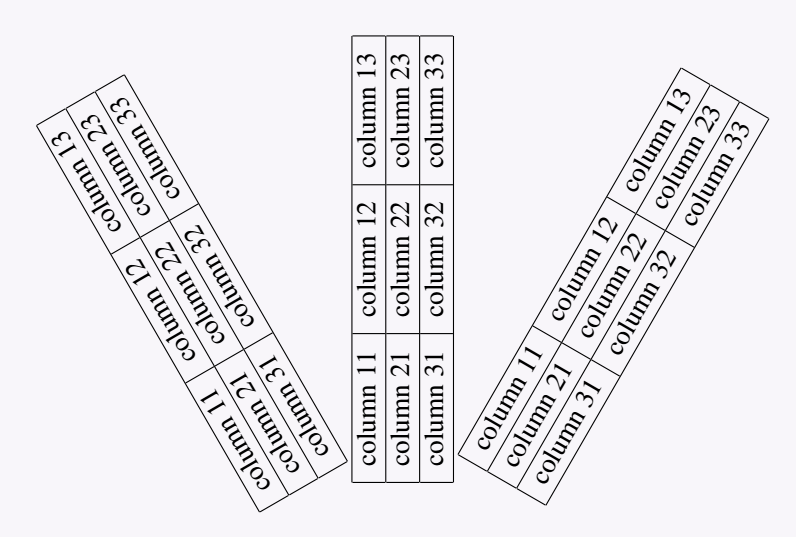
You can use this package along with minipage environment to rotate both the table and caption by a specific angle. Here’s an example:
\documentclass{article}
\usepackage{graphicx} % Required for \rotatebox
\usepackage{lipsum} % Only for filler text
\usepackage{booktabs} % Only for better table formatting
\begin{document}

\lipsum[1][1-4] % Filler text

\begin{table}[htb]
  \centering
  \rotatebox{45}{% Rotate the minipage by the desired angle
    \begin{minipage}{0.45\textwidth}
      \centering
      \caption{Your Table Caption}
      \label{tab:rotated_table}
      \begin{tabular}{lll}
        \toprule
        Header 1 & Header 2 & Header 3 \\
        \midrule
        Value 1 & Value 2 & Value 3 \\
        Value 4 & Value 5 & Value 6 \\
        Value 7 & Value 8 & Value 9 \\
        \bottomrule
      \end{tabular}
    \end{minipage}}
\end{table}

\lipsum[2][2-4] % Filler text

\end{document}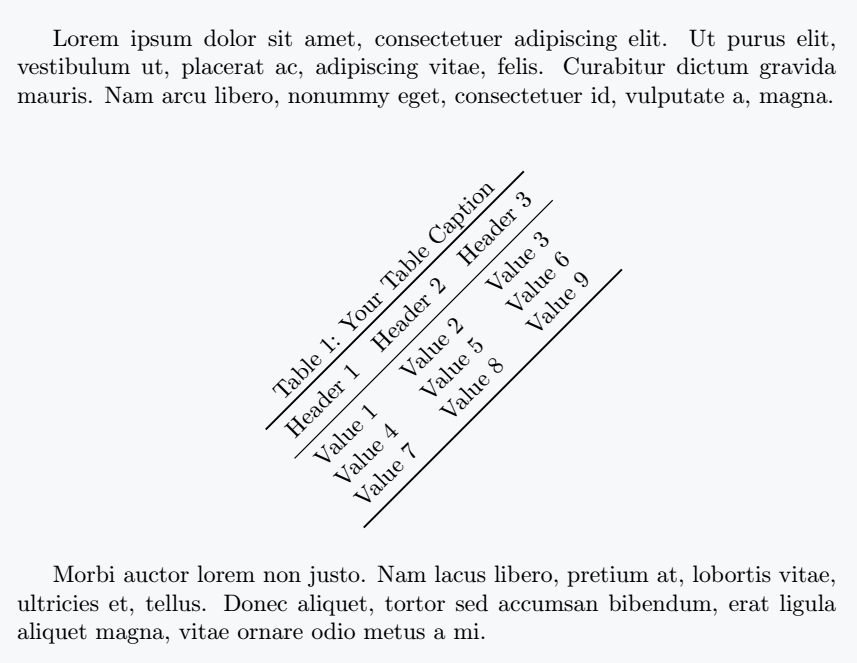
Use realboxes package with graphicx option
In our last example we used the graphicx package to use the \rotatebox command, and now we will use a package called realboxes with its graphicx option.
This will allow us to use the \rotatebox command that will treat the table as an image, but also reading the content as a real box, which means it could be use for more use cases compared to the regular rotatebox command.
Let’s create a new table that contains some special text and see how well it works with \rotatebox:
\documentclass{article}
\usepackage[graphicx]{realboxes}
\begin{document}
\Rotatebox{45}{
\begin{tabular}{ |c|c| }
  \hline
 power & result\\
  \hline
 $x^2$ & $4$ \\
  \hline
 $x^2 +1$ & $5$ \\
  \hline
 $x^3 +1$ & $9$ \\
  \hline
\end{tabular}}
\end{document}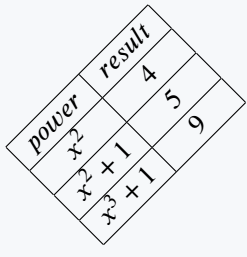
adjustbox environment from adjustbox package
If you would like to have something similar to the realboxes method, but don’t want to use a macro, and instead prefer an environment, then you should use the adjustbox package which contains the adjustbox environment. The syntax is as follows:
\begin{adjustbox}{angle=value} % table \end{adjustbox}
We will attempt to replicate the previous example with mathematical symbols using the adjustbox environment
\documentclass{article}
\usepackage{adjustbox}
\begin{document}
\begin{adjustbox}{angle=10}
\begin{tabular}{|c|c|}
  \hline
 power & result\\
  \hline
 $x^2$ & $4$ \\
  \hline
 $\displaystyle{x^2 +1}$ & $5$ \\
  \hline
$x^3 +1$ & $9$ \\
  \hline
\end{tabular}
\end{adjustbox}
\begin{adjustbox}{angle=-30}
\begin{tabular}{|c|c|}
  \hline
 power & result \\
  \hline
 $x^2$ & $4$ \\
  \hline
 $\displaystyle{x^2 +1}$ & $5$ \\
  \hline
$x^3 +1$ & $9$ \\
  \hline
\end{tabular}
\end{adjustbox}
\end{document}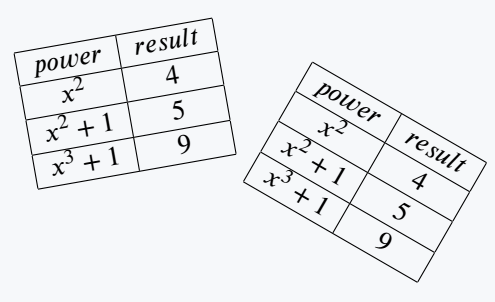
As you can see the adjustbox environment provides the same results as realboxes, but it could be more readable using an environment compared to a macro.
here’s another method using this package to rotate only table. This method allows you to have more control over the placement of caption with respect to rotated table.
\documentclass{article}
\usepackage{adjustbox} % Required for adjustbox env
\usepackage{lipsum} % Only for filler text
\usepackage{booktabs} % Only for better table formatting
\begin{document}
\lipsum[1][1-4] % Filler text

\begin{table}[htb]
  \centering
  \caption{Your table caption}
  \label{tab:rotated_table}
  \vspace{10px}
  \begin{adjustbox}{angle=30} % Rotate the table by 30 degrees
    \begin{tabular}{lll}
      \toprule
      Header 1 & Header 2 & Header 3 \\
      \midrule
      Value 1 & Value 2 & Value 3 \\
      Value 4 & Value 5 & Value 6 \\
      \bottomrule
    \end{tabular}
  \end{adjustbox}
\end{table}

\lipsum[2][2-4] % Filler text

\end{document}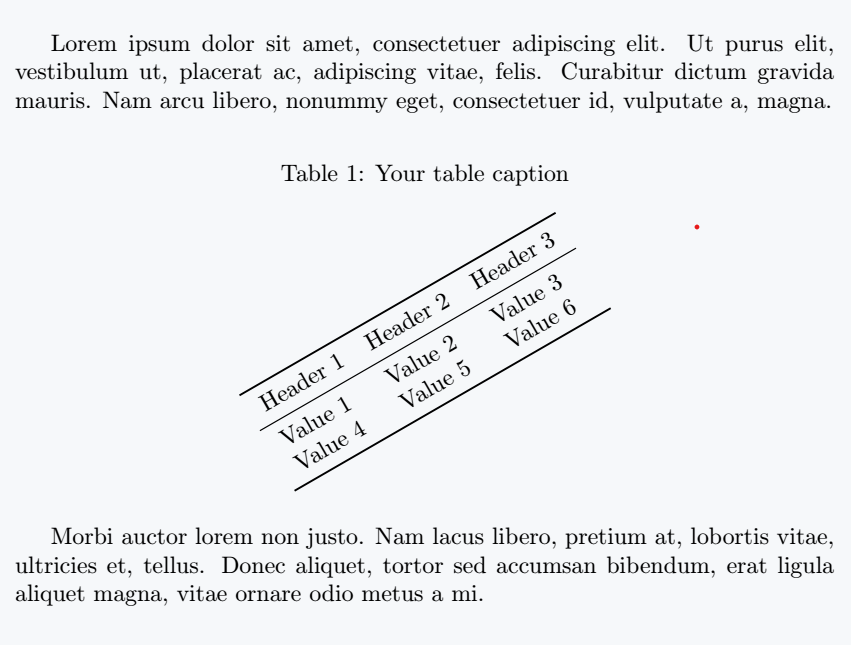
rotating package with sidewaystable environment
Use the rotating package to create a table rotated by 90 degrees counterclockwise. This package provides the sidewaystable environment, which you can use to create a rotated table.
\documentclass{article}
\usepackage{rotating}
\begin{document}
\begin{sidewaystable}
\centering
\caption{Your rotated table}
 \begin{tabular}{|c|c|c|}
    \hline
  Header 11 & Header 12 & Header 13 \\
    \hline
  Value 21 & Value 22 & Value 23 \\
    \hline
  Value 31 & Value 32 & Value 33 \\
    \hline
 \end{tabular}
\end{sidewaystable}
\end{document}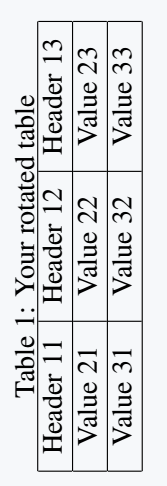
If you look at the output, you will notice that there is no special space between the caption and the table. You can add spaces manually with the \vspace{value} command if you want.
lscape package with landscape environment
The lscape package provides a landscape environment that rotates the entire page. This is useful when you have a large table that does not fit in portrait mode.
\documentclass{article}
\usepackage{lscape}
\begin{document}
\begin{landscape}
 \begin{tabular}{|c|c|c|}
    \hline
  Header 11 & Header 12 & Header 13 \\
    \hline
  Value 21 & Value 22 & Value 23 \\
    \hline
  Value 31 & Value 32 & Value 33 \\
    \hline
 \end{tabular}
\end{landscape}
\end{document}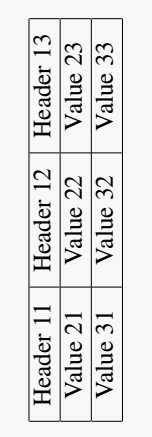
tikz package
The tikz package is a powerful graphics package in LaTeX. You can use it to create and manipulate graphics, including rotating tables.
\documentclass{article}
\usepackage{tikz}
\begin{document}
\begin{tikzpicture}
\node[rotate=90]{
 \begin{tabular}{|c|c|c|}
    \hline
   Header 1 & Header 2 & Header 3 \\
    \hline
   Value 1 & Value 2 & Value 3 \\
    \hline
   Value 1 & Value 2 & Value 3 \\
    \hline
 \end{tabular}};
\end{tikzpicture}
\begin{tikzpicture}
\node[rotate=60]{
 \begin{tabular}{|c|c|c|}
    \hline
   Header 1 & Header 2 & Header 3 \\
    \hline
   Value 1 & Value 2 & Value 3 \\
    \hline
   Value 1 & Value 2 & Value 3 \\
    \hline
 \end{tabular}};
\end{tikzpicture}
\end{document}
In this example, the tikzpicture environment is used to create a new graphics environment. Inside this environment, \node command is used to create a node with the table as its content.
Rotate option specifies the rotation angle (90 degrees counterclockwise in this case).
Conclusion
Rotating tables in LaTeX can be achieved through various methods using different packages and environments. Choice of method depends on the specific requirements of your document and personal preferences.
Some common methods include using rotatebox command from graphicx package, rotating package with sidewaystable environment, adjustbox package, lscape package with landscape environment, and tikz package.
By desired rotation angle, you can create a well-formatted and visually appealing document that effectively communicates your data through rotated tables.
Jidan
LaTeX enthusiast and physics educator who enjoys explaining mathematical typesetting and scientific writing in a simple way. Writes tutorials to help students and beginners understand LaTeX more easily.