In LaTeX, the \vspace command adds vertical space between elements, allowing precise spacing adjustments as needed. Below is a guide on its syntax and usage.
Table of Contents
Syntax of Command
This command can be used in two ways:
\vspace{length}
\vspace*{length}
length: Specifies the amount of vertical space to insert. Units like cm, in, pt, em, and ex can be used.
*(optional): Adding an asterisk (*) ensures that the space remains unbreakable, even if placed at the top or bottom of a page.
Using the \vspace Command
Proper spacing enhances a document’s readability. While several commands create vertical space, \vspace is the most commonly used. The following example will clarify its usage.
\documentclass{article}
\usepackage{lipsum}
\begin{document}
Lorem ipsum dolor sit amet, consectetur adipiscing elit. Suspendisse in imperdiet turpis. Cras ullamcorper felis vel convallis tincidunt. Praesent at accumsan orci.

\lipsum[2][1-3]

\vspace{20px}

\lipsum[3][1-5]

\vspace{30pt}

\lipsum[4][1-5]

\vspace{1.5cm}

\lipsum[5][1-5]

\vspace{1in}

\lipsum[6][1-5]

\end{document}
Output :
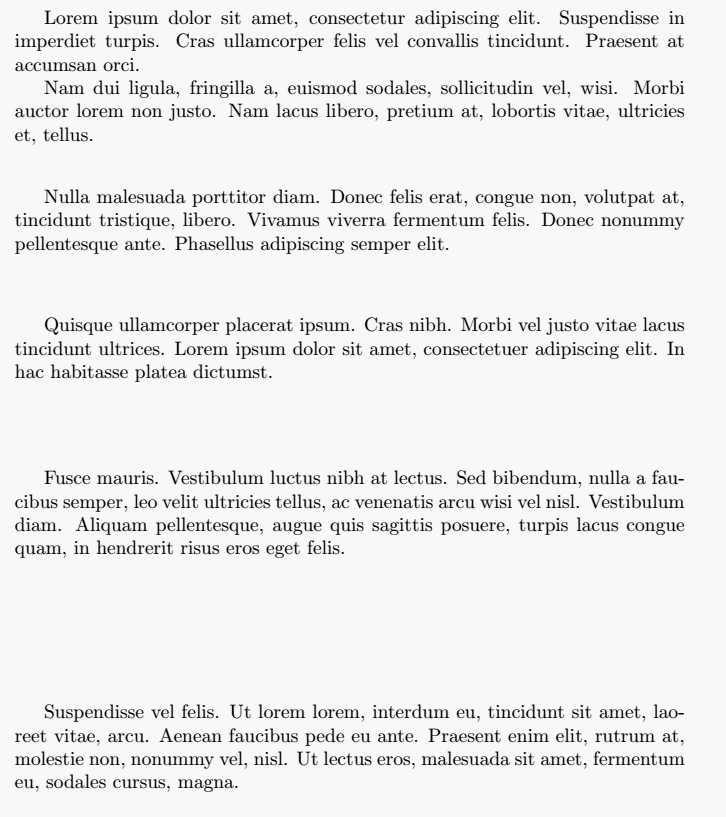
When compiled, the lipsum package generates dummy text based on specified paragraph and sentence ranges. The \vspace command then adds vertical space between them using different units like 20px, 30pt, 1.5cm, and 1in.
Using Negative Values
In some cases, you might need to reduce vertical space between elements, such as between a table and its caption. \vspace can take negative values to accomplish this.
\documentclass{article}
\usepackage{booktabs}
\begin{document}
\begin{table}
  \centering
  \begin{tabular}{|c|c|}
    \toprule
    \textbf{Column 1} & \textbf{Column 2} \\
    \midrule
    Row 1 & Content \\
    \midrule
    Row 2 & Content \\
    \midrule
    Row 3 & Content \\
    \bottomrule
  \end{tabular}
  \vspace{-5pt}
  \caption{A table with reduced vertical space between the table and caption.}
  \label{tab:reduced-space-table}
\end{table}
\end{document}
Output:
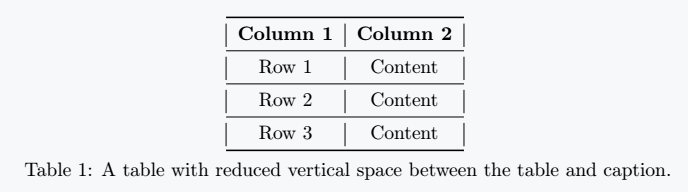
In this example, -10pt is placed right after the tabular environment and before the \caption command. This reduces the space between the table and its caption, bringing them closer together.
Similarly, negative values can adjust spacing between other elements.
Inline use in Paragraph
When using \vspace within paragraphs, you must manually add a line break (\\ or \newline) to ensure it takes effect properly. Without it, the spacing may not appear as expected.
\documentclass{article}
\usepackage{booktabs}
\begin{document}
\section*{Paragraph breaks are not occurring at the correct points}
Lorem ipsum dolor sit amet, consectetur adipiscing elit. Suspendisse in imperdiet turpis.\vspace{30px} Cras ullamcorper felis vel convallis tincidunt. Praesent at accumsan orci. Curabitur mattis tincidunt risus, non porttitor nulla vestibulum in. Aliquam mi odio, \vspace{10pt}finibus non purus a, auctor sollicitudin urna.Curabitur aliquam augue ut ex mollis blandit. Sed et ante a massa vehicula facilisis et sed sapien.
\vspace{10pt}
\hrule
\vspace{10pt}
\section*{Paragraph breaks at appropriate points}
Lorem ipsum dolor sit amet, consectetur adipiscing elit. Suspendisse in imperdiet turpis.\vspace{30px}\\ Cras ullamcorper felis vel convallis tincidunt. Praesent at accumsan orci. Curabitur mattis tincidunt risus, non porttitor nulla vestibulum in. Aliquam mi odio, \vspace{20pt}\newline finibus non purus a, auctor sollicitudin urna.Curabitur aliquam augue ut ex mollis blandit. Sed et ante a massa vehicula facilisis et sed sapien.
\end{document}
Output:
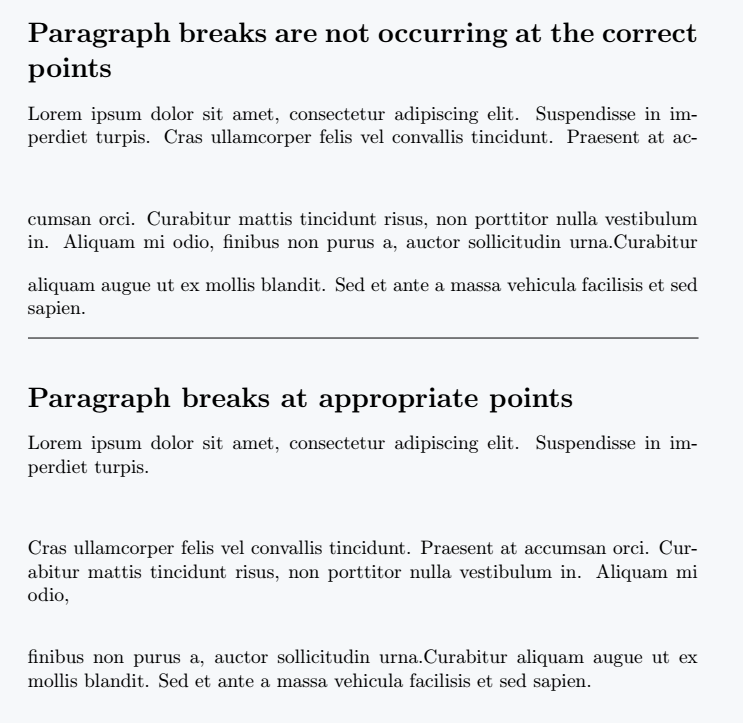
For better formatting, use \vspace independently rather than forcing it inside a paragraph.
Ensuring Consistent Spacing with \vspace*
Sometimes, adding space at the top or bottom of a page doesn’t work as expected.
\documentclass{article}
\begin{document}
\vspace{-4cm}
\section*{This command is not working}

Lorem ipsum dolor sit amet, consectetur adipiscing elit. Suspendisse in imperdiet turpis. Cras ullamcorper felis vel convallis tincidunt. Praesent at accumsan orci.
\end{document}
Output:
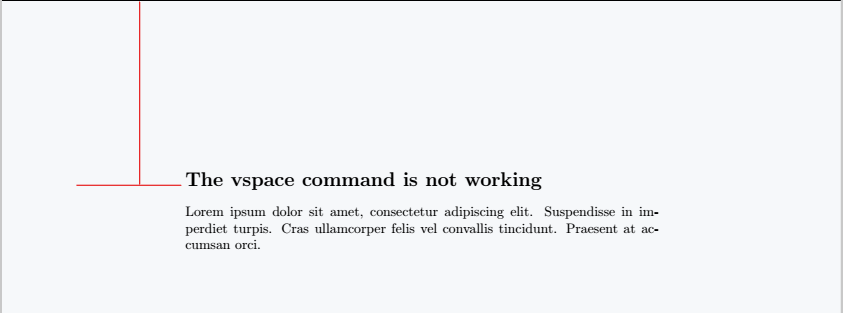
LaTeX may ignore \vspace if it appears at the beginning of a document or after a page break. To force the space, use \vspace*.
\documentclass{article}
\begin{document}
\vspace*{-4cm}
\section*{The vspace* command is working}
Lorem ipsum dolor sit amet, consectetur adipiscing elit. Suspendisse in imperdiet turpis. Cras ullamcorper felis vel convallis tincidunt. Praesent at accumsan orci.
\end{document}
Output:

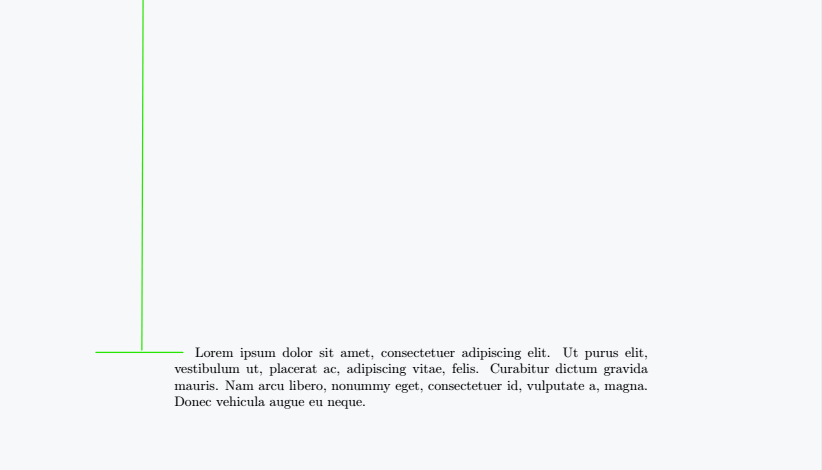
Similarly, you can increase vertical spacing at the start of the document.
\documentclass{article}
\usepackage{lipsum}
\begin{document}
\vspace*{4cm}
\lipsum[1][1-5]
\end{document}
Output:
Jidan
LaTeX enthusiast and physics educator who enjoys explaining mathematical typesetting and scientific writing in a simple way. Writes tutorials to help students and beginners understand LaTeX more easily.